Sunday 22 June 2014

Assignment 1 & 2


          Assignment 1 is all about HIV/AIDS awareness poster in Africa, then connecting the poster with QRcode with the poster's detail in it 
        
         Assignment 2 is all about after effect to create typographic text and images with the music of your choice


Lecture 11 & Chapter 14: Digital Video Data Sizing 

         Firstly, i learned what is data rate. Data rate is the rate at which information being transferred, it is expressed in terms of [amount of information] per [unit of time]. Example, Data rate used to describe the speed of a hard drive is Megabytes/secondFor compressed audio files, kilobytes/second is used. When a data rate is determined, you can calculate the estimate amount of hard drive space needed to store the video.

      Secondly, i learned how to calculate the file size of an uncompressed digital video & converting bytes to gigabytes. Then how to calculate the file size of an uncompressed audio file.
     The formula is as follows:                                                 Raw video data size
     = frame size (width X height) * frame rate (fps) * color depth            (in bytes) * time (in seconds).

      Converting bytes to gigabytes. 
    
      8 bits = 1 byte
      1 kilo(bit/byte) = 1,024 (bits/bytes)
      1 Mega(bit/byte) = 1,048,576 (bits/bytes)
      1 Giga(bit/byte) = 1,073,741,824 (bits/bytes)
             
      The formula is as follows: 
        8-bit mono  Second*KHz = Size
       16-bit mono (Second*KHz)*2= Size
       8-bit stereo (Second*KHz)*2= Size
       16-bit stereo ([Second*KHz]*2)*2= Size
       16-bit stereo ([Second*KHz]*2)*6= Size
    
            Finally, i also learned how to determine the factors to be            considered in graphics selection for a multimedia project. Which        are Purpose The aim which the product has been produced,             Quality Product must reach aim of the quality as specified by          the client, and Cost depend on the quality and aim. 


Lecture 10 & Chapter 13: Using Darkroom Tools
    
            Firstly, i learned how to apply the Clone Stamp tool to hide flaws. Picks pixels from one area and pastes them into a new area. Aligned source-destination relationship remains constant. Non-aligned pixels are applied anywhere. Option/Alt click to collect pixels from one location. Click in the new location to paste pixels.


              Secondly, i learned how to work with the healing brush. it use to retouch and repair areas of subtle gradations, it works like Clone stamp. Option/Alt-click to “load pixels” Click to paint pixels. The Healing Brush makes subtle changes so multiple passes are usually required. it works like clone stamp tool except that Photoshop calculates a blending of the sample pixels and painting area so that the restoration is especially subtle.


             Thirdly, i learned how to use the Patch tool to repair solid-color areas .Its used to repair large areas of solid or near-solid color. Source – repairs the selection shape & Destination – repairs the re-positioned location. Then how to analyze an image from the upper left horizontally across the image and back to the left. works like healing brush tool but instead of using brush strokes to paint from a designated area, you drag a marquee around the area to be fixed. History  brush works like clone stamp tool except that it paints pixels from a designed previous state or snapshot that you select in the history palette.

                  Finally, i learned how to softening images with Gaussian Blur. Softening is used to blur and smooth gradations to make an image appear softer Blurring averages dark and light values Gaussian Blur can also be used to prevent banding in blends


Thursday 19 June 2014

 Lecture 9 & Chapter 12: Using Windows Movie Maker

        Firstly, i learned how to be able to describe various broadcast video standards. Which are NTSC(National Television Standard Committe) consist 522 line/60Hz, & 30fps this standard is used primarily in north america, taiwan, south korea & japan. PAL(Phale Alternate Line)625 line/50Hz, & 25fps, this standard is used primarily in europe, asia and south africa, & SECAM(Systeme Electronique Couleur Arec Memoire) consist of 625 line/50Hz, & 25, this standard is used primarily in france, part of middle east, and russia.

         Secondly, i learned how to able to describe video aspect ratio. The aspect ratio of a frame describes the ratio of its width to its height in the dimensions of a frame. For example, the frame aspect ratio of NTSC or PAL video is 4:3, whereas DVD, HDTV, and motion-picture frame sizes use the more elongated aspect ratio of 16:9. 
Lecture 8 & Chapter 11: Drawing Shapes

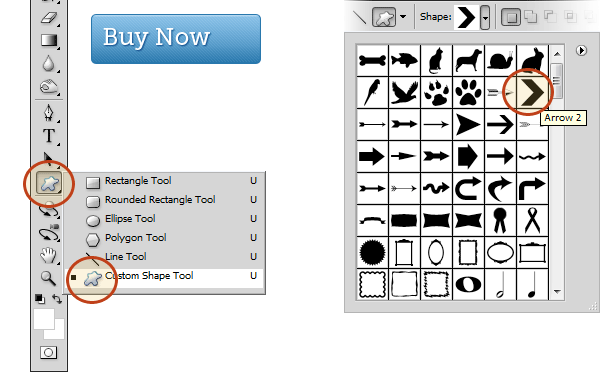
               Firstly, i learned how to used different type of shape tools & three different types of shapes can be created with shape tools. Which are Rectangle tool, rounded rectangular tool, ellipse tool, polygon tool, and custom shape tool. Then option to select before using the shape are clipping mask is a shape that acts like a cookie cutter, path shape is like the paths created with the pen tool, and fill shape is created with pixels.


            Secondly, i learned how to work with shape & what is a path layers. Paths are lines and curves that make up the outlines of vector graphics, shape layer acts like a cut out – cutting the shape out of a layer, two thumbnails on a shape layer, the thumbnail on the left is a fill layer, which contains pixels of color, the thumbnail on the right is a vector mask, which contains a vector-based circle shape,that shape acts as a mask, and hiding all the fill layer pixels outside of the white area of the mask. You can load custom shape libraries by using the drop down menu on the options bar.


 Lecture 7 &Chapter 9 & 10: Text


          Firstly i learned  what is type and how to create type elements. Photoshop type is made with vectors, vector is composed of line & points. Type options can be set in the Options bar, they are orientation which can be use rotate your text, font family which you can select the type of text, font style which you can select a text style, font size which you can re-size your text, font color to set color, anti-aliasing to smoothing the striking edge of a text, justification, and warp setting to create warped text which will allow you to fit text with a special design problem.
       Secondly,i learned how to control the font attributes. Which include, kerning used to adjust space between characters/alphabet, tracking to adjust space between words, vertical & horizontal scale to re-set size, leading to adjust lines in paragraph, baseline shift to adjust a character up & down, and attributes, such as superscript, subscript, all caps & bold.


    Thirdly, i learned how to manage the type layers & paragraph type. When type layers are linked, they can be moved as one layer, type layers can be merged or combined into one layer, flattening or merging layers containing type will rasterize the type, and rasterized type is not editable. Then it is always a good idea to save a copy of the file in PSD format to preserve all data. A paragraph is a series of words created when you start typing and ends when you press the Return/Enter key, text can be copied from another application using the clipboard, text from the clipboard can be placed in a text box in Photoshop. text box is contained within a specified region.
              Finally, i learned how to used text as a clipping mask &  Apply special type effectsA type mask can be used to add a gradient fill to text, the type mask is a selection in the shape of type that can be filled. Layer styles can be applied to type layers, layer styles can add drop shadow or bevel & emboss effects.


Tuesday 17 June 2014

Lecture 6 & Chapter 8: Filters


    Firstly, i learned what is filter & how to work with filter gallery. Filter are special tools that allow you to apply special effect to your image. It can be used in several ways, like enhance images, create artwork, add lighting effects, repair damage, improve sharpness and soften harsh details. Filter menu contains: standalone filter that contain one component, primary filter groups & third party filter that has sub menu/options below to choose, and filter group sub menu. The Filter Gallery shows generic previews of the effects of each filters & options for filter effects can be found on the right side of the gallery. You can add more than one filter effect by clicking the New Filter button.
                         
Filter Sub menu                                                                                                                                                           Filter gallery menu


          Secondly, i learned how to combine application of filters with selections to create custom texture. It is a good practice to create a duplicate of a layer before applying a filter to preserve the original pixels.
           

        Finally, i learned how to used the Liquify filter. The Liquify Filter allows you to push pixels around as if they were wet paint. which are wrap turbulence, twirl, twirl, push, mirrow, ccw, pucker, bloat, pixel shift and reflect. The Mesh feature is useful when you’re trying to keep distortion relative to the objects in the original image. The Freeze Mask protects portions of an image from distortion.